Fire is a magical thing, and more fun to watch than most TV shows (which shows how limited my sense of fun is). Our ancestors were really no different than any other primate until they learned to control fire. Most naturally occurring wildfires come from lightning strikes (the only other source I know of would be volcanic eruption, but I could be wrong), and for a long time that was the Homo family’s only real source of fire. Then one day some super genius, who makes all other geniuses of history pale in comparison, discovered that with a little wood and a lot of patience you can start a fire by rubbing two sticks together.
There are many ways to start a friction fire, but the one that you will see in all survival manuals is the bow drill. Why? Two words: mechanical advantage. Other methods, like the hand drill or fire plow, are completely valid methods of fire starting, and their practitioners are truly impressive to watch. However, the bow drill uses the mechanical advantage of the bow and increased pressure from the socket to make the process of bringing wood dust to 800 degrees Fahrenheit much easier. Here in Minnesota it is either (a) humid or (b) cold at any given time, both of which make a friction fire a more difficult proposition.
I am not going to go through a lecture of explaining the principles of the bow drill; there are already many excellent books and websites that explain the process in detail (my favorite is here). I will describe what tricks I have learned from making fires with a bow drill. At this point I have made a couple of dozen fires with several drill sets over the last couple of years (I apologize for not having any action photographs, but it is really hard to shoot a camera while pumping the drill), so I believe that I can say that I am consistent under good conditions (i.e. not too humid).
90% of the bow drill’s success lies in the selection of wood. I wish I could give you a careful list of wood species that work better than others, but I select wood by feel, not by species. In the woods behind my house there are mostly quaking aspen, white birch, and black ash, so I am confident in the qualities of those woods in particular. I have also had luck with cedar, but most evergreens are generally regarded by those I have read as being a poor choice for friction fire. The qualities I look for are:
- The wood should be dry, light, and quite firm. Cut into the wood to make sure that the core is not punky or damp. Unless you have tools to fell a dead standing tree (a live tree will probably have too much moisture to work), you will most likely be gathering dead wood from the ground, so be wary of rotted wood. If the hearth wood indents more than about 1/8 of an inch when the drill is firmly pressed into it, it will generally turn to dust rather than heat up to combustion temperatures.
- The drill needs to be as straight as possible. While a longer drill makes it easier to operate the bow and will last longer, if it has any bend in it at all it will be difficult to keep in the notch. I have used drills that were only 5 inches long, and although I banged my knuckles on the ground a lot, they worked.
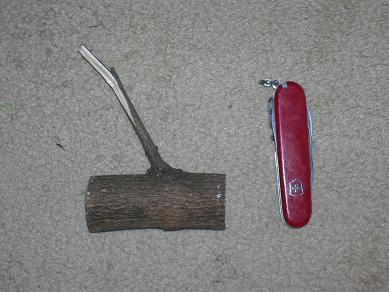
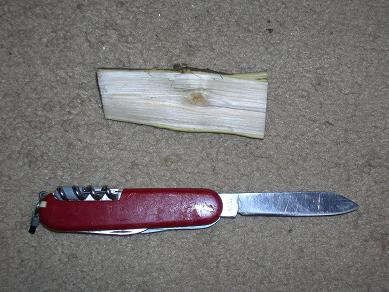
- The hand socket is best made, in my opinion, from a section of branch with a knot in it. If you split the branch down the middle so that the knot will be in your palm when operating the drill (trimming it to make it comfortable, of course), the wood will be harder (you don’t want the socket to wear too quickly), and often will form a natural socket during the splitting process. By the way, you can split a branch with a pocket knife if you use a stick as a mallet to drive it in, so if you don’t have an axe you can still form a flat surface. There are alternative materials to make sockets from (that Australian site I linked has a cool method using a beer cap, but I have only used it successfully once), but wood will generally be the most prevalent.
Just carve a small depression in the low spot formed by the knot
- The bow is generally the easiest piece to find; you just need a springy branch. The cord can be the harder part to pull out of nature (I have tried using cordage made on the spot, but it usually wears out before I can get a coal), but do not despair. Unless you went into the wilderness buck naked (not advisable during black fly season), you can use your clothing. Shoelaces are the best option, but you could also cut the hem of you shirt off and tie that to the bow (twisting it to make it round in cross section).
Now comes the tricky part: starting the fire. Again, there are many good sources of information on how to do this, so I will limit myself to giving tips.
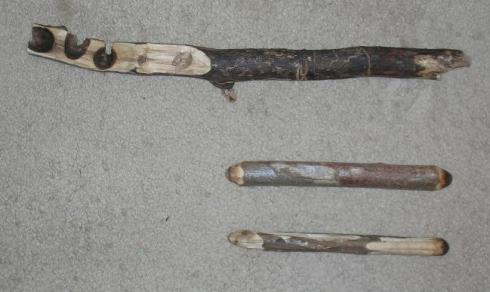
Here is a round hearth and a couple of drills that I used succesfully
- You don’t need a flat board. Most diagrams of a bow drill show what looks like a piece of milled lumber as a hearth. Unless you can scavenge a 2X4 from your survival site (which is possible, but I would not rely on it), you will be starting with round sticks. All you really need to do is carve it flat enough on the top to be able to start the drill; your foot pressure will usually keep the drill from moving. A round hearth can often be an asset as you can roll it to a different angle if the drill is wandering on the notch or if you prefer to drill at a slight angle.
- Make the bottom of the drill (where it meets the hearth) a shallow point. Most books tell you to keep this flat, but I have found that a slight point will help you to start the drill into the hearth. Unless you are willing to spend 10 minutes carving the perfect depression for a flat drill, you will find it frustrating keeping a flat bottomed drill from migrating all over the hearth. As the drilling progresses the drill will even out with the hearth anyway.
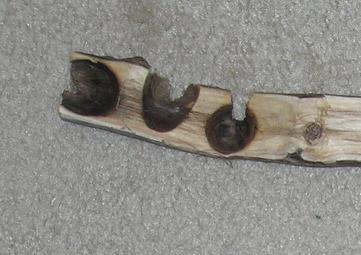
- Drill at a slight angle so that the drill pressure is away from the notch. Often if you drill straight down, the dill will wear itself toward the notch, which can result in the hearth socket disintegrating.
The socket on the right was successful, but the two on the left are examples of how the drill can eat its way out of the hearth
- Try not to lift the drill off of the hearth. You are relying on the insulating properties of the wood to help hold the temperature from the friction. Pulling the drill out of the hearth is like opening a house door in the winter; it lets all the heat out.
- It is okay to rest. When I am building a fire, I will usually rest for two deep breaths every 30 seconds. As long as you keep the drill on the hearth, it will hold the heat.
- Watch the dust pile. The fiction will create a mound of sawdust in front of the notch in the hearth. This is the tinder that will eventually form your coal, and thus is precious. I generally leave the dust alone, but if I am creating an especially big pile I will knock a little of it away to make sure that oxygen is getting to the base.
- Keep the process going until you see smoke coming out of the dust pile in front of the notch. You will see copious amounts of smoke coming from the around the drill, but when smoke is starting to stream from dust itself, you have a coal.
- Once you have your smoking pile of dust, leave it alone for a bit. The worst thing you can do is try to transfer it to the tinder before it forms a coal. The pile will smolder on its own for a good five minutes, so shake out your arms, ready your tinder, and do your happy dance.
There are few feelings as good as starting a fire with a bow drill. It is a primal sensation that gives you a sense of mastery over your surrounding. However, there are some important observation I must make about the bow drill.
- Even with good materials it can take hours of effort to get a fire going. Do not expect to gather some sticks off of the forest floor and have a fire in 20 minutes. If you are in a survival situation and you do not have an alternative fire starting method, expect as a matter of practicality to spend half a day making your fire. If it is really wet or humid you may never get a fire going by friction. Practice will make the bow drill more reliable for you, but always err on the side of safety.
- Once you have a fire going, make every effort to keep it going and bank the ashes at night to keep them smoldering.
- Even if you have an alternative fire starting method, you still may want to gather the materials for a bow drill in case you are stuck in a long term survival situation. Peeled wood will dry quite fast, and if you make a drill set and allow it to dry in your shelter for a few days (along with some tinder to keep it dry), you will be ahead of the game if you need it later.
If you hope to use the bow drill method when it matters, I recommend you practice now. That first fire can be insanely difficult to start, but once you get that one going, the rest will come easier. If nothing else, you will learn to appreciate matches and lighters, and will probably start carrying one everywhere just in case. I always have a fire starter on my Swiss army knife (which I carry everywhere but the shower; that would just be weird) and multiple fire starters in my survival kit, but if I lose them I know that I might be able to get a fire going anyway. Survival is like poker: it is a game of odds, but an experienced player can stack the odds in his or her favor.


1 comment
Comments feed for this article
June 17, 2012 at 12:49 am
bill dobbin
never leave home without it. what I did is I went to my local home depot bought all the stuff to make it keep it in my truck and if I go camping or backpack in it goes with me.