You are currently browsing the tag archive for the ‘survival’ tag.
Those of you who read my earlier blog about my survival kit might have noticed that I keep a folding razor blade with it to act as an emergency knife. Although it fits well in the kit, I have always been a bit uneasy about including a razor instead of an actual knife. Razors are extremely sharp (which is good), but lack the durability and backbone of a knife (which is bad). A razor will split a fish open quite efficiently, but trying to carve wood with it can snap the blade if you are not careful.
In my usual web-wanderings I happened to come across this site by M40, where he shows how to grind a knife out of a carbon steel hacksaw blade. It is pretty simple, but like most simple things, brilliant. Here is mine I made in about an hour and a half (including sharpening):
My knife is not the work of art that M40’s is, but it works. The whole knife is only 3.5″ long so that it will fit in my survival kit container. It is also much thinner than the folding razor (which has a plastic handle), so it will fit even better in my small kit and give me more room for other stuff. I used a carbon steel hacksaw blade with 14 teeth per inch (which should cut wood better than a finer blade) which now adds a saw to my kit as well! As it is carbon steel it also could theoretically spark off of a quartzite or flinty rock, but it is pretty light for that so I will stick with my other methods for now.
The grip is too short to hold securely in the hand, so I followed M40’s example and attached a cord loop to the end of it for my ring and little finger to make the blade more comfortable to use.
The cord loop also makes it easier to use as a saw:
I used the end of the hacksaw that had the teeth angled so they would cut on the draw, which is way easier that if you had to cut on the push, especially without a proper handle.
As the tip of the knife comes to a sharpened point, it could be lashed to a stick as a spear of some sort (as M40 does) and could probably be tied into the split end of a bow drill to serve as a drill bit. I might even drill a hole in the blade to serve as a second anchoring point.
The knife is not going to win any contests on efficiency or style, but it will do its job which is to serve as a practical backup to whatever knife I am currently carrying.
I am sure that there are a lot of other similar projects that could be done with hacksaw blades. I don’t know anything about spear fishing, but you could probably make a pretty fair harpoon point.
If you like the concept of this knife, be sure to look at M40’s page; his knife is definitely better looking than mine.
Like most of you who are into bushcraft and other like pursuits, I get the bulk of my information from books and magazines. In this age of mass media we have tremendous resources at our disposal for researching anything from edible plants to making pottery. This boom of information technology is a godsend to all of us, but the downside is that we are so deluged by information that it can be difficult to separate the wheat from the chaff.
Take the subject of survival. If you run a search on Amazon.com you will find dozens of books on the subject of survival, but not all of them are created equal, in my opinion. Books are big business and many manuals written by experts are flashy and full of pictures, but often contain little useful content and what they do have can be quite vague.
I have read a great many books on survival, bushcraft, and like topics, and will give you a short list of some resources that I consider to be quite good. I will reiterate that I am not a definitive expert on any subject here, and many of you might feel that these sources are not as good as others that you have read or watched. If there is any media that you find particularly noteworthy, please feel free to share them with everyone else. So here we go…
- U.S. Army Survival Handbook – You do not have to be a veteran to appreciate this manual as a great survival resource. It is well put together and is generally pretty thorough on the important subjects. Unlike many writers, the army is not trying to sell books; they are trying to train soldiers (the rest of us get to read it because of the Freedom of Information Act). The manual contains a lot of information about escape and evasion strategies that won’t apply to most of us, but on the whole the book is worth its weight.
- SAS Survival Handbook – This book can be a little more vague than the U.S. Army Handbook, but it covers a great array of subjects including survival kit construction, survival in different environments, and edible and medicinal plants. They also make a pocket version that takes up little space and can be thrown into a daypack or glove compartment without difficulty.
- Outdoor Survival Skills – This book is considered by many to be the Magnum Opus of bushcraft, and for good reason. It has been in continuous print for over 40 years and was the book that inspired my interest in bushcraft when I was still a Boy Scout. It covers topics from bow making to hide tanning to hot coal beds and so on. It also has some good stories about the psychology of survival that are entertaining and educational.
- Chippewa Customs – If you want to learn about bushcraft in North America, a good place to start is with the skills and traditions of the original peoples who have thrived here for many millennium. This book, originally published in 1929, chronicles the culture, religion, and industry of the Ojibwa people local to my area. If you do not live in the upper Great Lakes region, look for book about the people who lived in your area before European influence; it will give you a whole new perspective to your home region.
- Backwoodsman Magazine – I have recommended this magazine before, and think it is a wonderful periodical. There are many contributors and the topics range from gardening to black powder rifles to the firesteel that I showed you on my knife. Some of the contributors often have political undertones to their writing which may put some readers off, but whether your are an eco-hippie or gun toting survivalist, you will find stuff in there that will appeal to you.
- Survivorman (not a book, but still good)- I know that this TV show is controversial in the survival community, but I believe that it has real value as an educational resource. There are lots of commentaries about how what Les does is all wrong or that he is a fraud, but most of the critics appear to be either a) armchair survival experts who like to talk smack, or b) real survival experts who are trying to market their own competing books or shows. While he often fails at what he does, that is the reality of survival. Keep in mind that he is trying to film a TV show on his own and is often putting himself outside of his area of expertise (which is consistent with many if not most survival situations). What he demonstrates is that thinking outside the box, trying to keep a sense of humor, and maintaining the right attitude are essential to keeping alive when you are lost or stranded. He also has a book out that has some really good information based upon his personal experiences. If you do not like his show, that is your right, but this is my blog and I like him (so put that in your pipe and smoke it).
- Buffalo Bird Woman’s Garden – An extremely thorough narrative of a Hidatsa woman relating the traditional agricultural practices of her village. The Hidatsa were some of the premiere farmers of the North American continent and grew corn, beans, squash, sunflowers, and tobacco; many of their cultivars still are bred today (I have grown shield figure beans myself). The book chronicles tools, ground preparation, planting, harvesting, threshing, customs, and cooking. A must read for anyone interested in gardening using traditional methods (you will be the talk of the garden club if you use a deer scapula hoe).
- The Forager’s Harvest – In my opinion the best book that someone trying to learn about wild edible plants in the Midwest could buy. It is by no means a comprehensive guide to wild plants, but it covers the more widespread and easy to identify plants like cattail and burdock, and does so with more detail than any other book I have read. Samuel Thayer covers identification, habitat, poisonous look-alikes, harvesting season, preparation and storage, and includes plenty of high quality photographs. He relates his own personal experiences such as discovering the fallacy of of milkweed’s bitterness (I have eaten milkweed myself and did not find it bitter in the least) and unearthing a several pound hopniss tuber (dubbed the Hopness Monster). If you live in the Midwest and want to learn to identify some good edible plants, you should get this book.
- A Field Guide to Edible Wild Plants: Eastern and Central North America – While it lacks the detail the the previous book, it makes up for it in volume. Most images are drawings rather than pictures, but it contains several hundred wild edible plants. I use it as a beginning reference when I am evaluating a plant to determine what it most likely is, and then run web searches to get photographs to confirm what the plant is (Note: sampling wild plants without the supervision of an expert can be dangerous, so if you start sampling plants and get sick, don’t blame me).
This is just a short list of some of my favorite books; there are many other books that are just as good as anything I have up here. Reading about things is no substitute for actually doing them, but we all have to start somewhere. I would give these books a shot, but as they say in Reading Rainbow: “Don’t take my word for it!”
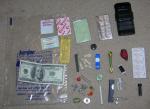
Oh Goodie! Yet another blogger who posts pictures of his survival kit; that’s original. I know, I know; there must be 100,000 survival kits posted on the internet ranging from duffel bags containing four year supplies of Spam and 80mm mortars, to mini kits so tiny that they are mistaken for suppositories. What does this mean? That there is no such thing as one perfect survival kit. All of us have different abilities, needs, and priorities when it comes to survival and our kits reflect that. You will also find that if once you start building a survival kit, it will forever be a work in progress; you will be constantly reorganizing, refining, and redesigning. Why? As you try different things and read different peoples’ work, you will find better gear to carry and new ideas to explore. Plus, playing with your survival kit is just plain fun!
There are many companies out there who make a living selling already completed survival kits. I have bought a couple over the years, but mostly for parts. Commercial kits often tend to be gimmicky and include things like tea bags, hard candy, and chapstick that might be conveniences, but take up valuable space that could be better used for more vital equipment. Also, as a major goal of business is to keep production costs down, the items in commercial kits can often be cheap and unreliable. This is not to say that there are not some great kits out there, but I believe that a premade kit should only be a starting point and will need refinement.
Then there is the subject of size. There are two major schools of thought: those who think kits should be big enough to carry the best equipment, and those who think kits should be small enough to be carried at all times. The people who believe in big kits include things like hatchets, radios, and firearms and their kits are usually between lumbar pack and backpack sized. Their philosophy is well founded; a good axe greatly simplifies life when making a fire, and a good firearm will outperform a throwing stick or a sling. While I do see the logic of their kits, I find them too bulky to be practical. When your kit is the size of a backpack, or even a lumbar pack, you will find excuses to leave it back in camp because it is such a pain to carry. Murphy’s law states that it will be the time that you are without your kit that you will get lost.
The pocket sized kit, on the other hand, is small enough to be carried comfortably at all times. If your kit is not a burden, you will be more apt to have it on you when you really need it. The down side of small kits is that in order to make them small, compromises have to be made. Axes are replaced by wire saws, and firearms by snare wire. What they gain in smallness they can lose in durability.
Despite the compromises, I subscribe to the pocket kit theory. When I am carrying a 50 pound canoe and 60 pound pack, I don’t really want to be toting another 10 to 15 pounds of survival kit. Besides, the more you strive to learn the ways of the woods, the less gear you should need (that is the theory anyway).
Building a survival kit is a very personal affair and should be built with a plan in mind. Too many kits are thrown together without considering the potential uses (or lack of use) of the items included. Looking at other people’s kits over the years has given me inspiration, and is a good way for you to determine what you want include in your kit.
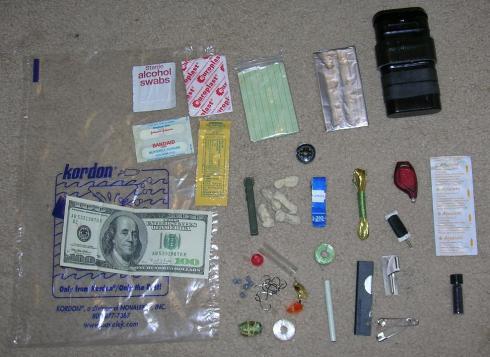
My personal kit is based loosely on the SAS kits made famous by the British soldiers of that organization. They are traditionally built using a 2 oz tobacco tin, and are explained thoroughly in the SAS Survival Guide by Lofty Wiseman. I have strayed a bit from the traditional kit perhaps, but I have a plan for everything in my kit. Here it is:
- The Tin – It is an old container from a surplus East German 7.62mm rifle cleaning kit. Unlike Altoids cans (the usual containers for these kits since tobacco tins have become harder to find) it opens from the end. This has two great functions; first, I can fit more into it without the lid popping off, and second, I can wrap things like duct tape around the container. Plus, I find it fits more comfortably in my pocket than a traditional tin. I waterproof it with a strip of duct tape around the top.
- Spark-Lite and Tinder Tabs – It’s like a lighter flint on steroids. The included tinder tabs work great with it (and only part of a tab need be used for each fire), and I have also been able to ignite plenty of natural tinders like cattail fluff and finely shredded birch bark.
- Waxed Book Matches – There are better matches on the market, but a cut down book of matches (there are eight matches included, and they can be split to make 16) that is waxed to make it waterproof fits better, keeps the matches together, and provides a striker. It is meant to be a backup to the Spark-Lite, not a primary firestarter.
- Folding Razor – A simple razor blade attached to a plastic handle. A razor blade is no equal to a real knife, but it if I lose or damage my pocket knife I will at least have a sharp edge to work with.
- P-38 Can Opener – I have sharpened this so that in addition to being able to open cans I can also use it as a gutting hook to help clean game and fish.
- Small LED Light – Night vision is great, but a simple light can make all the difference in the dark. With the development of new LEDs, you can find very bright lights packed into tiny packages that fit easily into survival kits. If you need to use it at night, close one of your eyes; it will help keep your night vision.
- Duct Tape – Five feet wrapped around the tin. The uses of duct tape are limitless. You can make a splint, seal a wound, patch a leak, form a cord, lash poles together, or anything else you can imagine. Duct Tape is also flammable; something worth remembering if you are short on tinder.
- Innertube Bands – Two, looped around the tin. Simply sections of an old innertube, they make great rubber bands. I mainly include them to make the casting stick I wrote about previously, but like duct tape they could be used for multiple purposes.
- 40 Pound Test Woven Fishing Line – 25 feet of Spiderwire brand. This is not so much for fishing as for use as high quality cord. Rope is of limitless value for everything from making tools to building shelters, and although making passable cordage is not difficult given the right materials, some good high test cordage is not something you want to forget.
- Eight Pound Test Fluorocarbon Fishing Line – 50 feet. Fish are one of the easier creatures to catch for food, and fishing line takes up little space. Many kits include cheap line, but when my life might depend on something I want the best. Fluorocarbon line is almost invisible in water, and at eight pound test offers some forgiveness when fishing without the benefit of a fishing rod.
- Fishing Kit – A Panther Martin 1/32 oz gold fly lure, nine Gamakatsu Hooks, and six sinkers. I have had caught many fish with Panther Martin Style lures, especially the gold plated ones (nothing beats gold for shine and it doesn’t tarnish like silver or brass). Gamakatsu hooks are top quality and incredibly sharp; I have always had the best luck with size six hooks, and have caught everything from three inch suckers to a three pound smallmouth bass with them (I let the bass go, so if you are on Lake Brule in the BWCAW, you can try to find it; say hi from me if you do).
- Nightline Kit – That is what the little green bundle in the bottom center of the picture is. It consists of a 24 foot line (40 pound test) with snap swivels at each end. At the 8, 12, and 16 foot marks there are fluorocarbon lines (8#) tied to the main line (3, 4, and 3 feet long respectively). Three size six hooks are included to tie to each hanging line. By securing one end of the long line to shore and anchoring the other end out in the water (or suspending across a stream), you can have multiple hooks fishing for you at all times. You may cover more ground with a fishing rod or casting stick, but having the nightline out day and night will increase your odds of catching something.

A nightline works like this (from the U.S. Army Survival Manual)
- Snare Kit – 14 feet of brass wire, and eight feet of 40 pound line. Snares are a fast and easy way to get traps out and working for you. Most kits I have looked at seem to only include about 2 or 3 feet of wire; that only comes out to about 1 or 2 snares. Most estimates for successful trapping say you should have 20 or more traps working to ensure a reasonably reliable food supply (per person surviving). 14 feet of wire will make around 5 rabbit sized snares and a squirrel pole with 3 smaller snares (the eight feet of line is to help secure the wires to anchor points). This is only a start, but will enable me to already have traps out working while I make deadfalls or go fishing to round out my food supply. A good basic how-to on snaring can be found here on YouTube.

Squirrel Pole taken from U.S. Army Survival Manual
- Sewing Kit – Two sewing needles and 10 feet of thread. For making and repairing clothing, or sewing wounds (I hopefully won’t have to try this one out).
- Two Safety Pins – Great as garment fasteners, makeshift fishing hooks, ferrules on a fishing rod, or grommets on a tarp.
- Aluminum Foil – 18″ square, heavy duty. Serves to make a pot to boil water for purification. In addition, boiling any fish, meat, or plants you forage to make a stew will enable you to get all the nutrition out of your food. If you crack and boil the bones of snared animals, you can extract the high fat content of the bone marrow and bone grease, helping to avoid rabbit starvation. The local Ojibwe peoples used this method to get fat from the overly lean cottontail rabbits and snowshoe hares of my area according to Francis Densmore.
- Water Bag and two twist ties – The type used for transporting goldfish. I used to carry a condom like everyone else, but they are difficult to fill and can be fragile. These fish bags are waterproof, robust (I can stick my finger up to the second knuckle in a full one without causing a leak), and hold a little over a liter. This brand supposedly can keep goldfish alive by releasing CO2 through the bag walls; I might see how my extra bags do for transporting minnows.
- Aquatabs – 10 chlorine purification tablets (purifies 10 liters) in a flat package perfectly sized for my kit. As my supply of Aquatabs is finite, boiling in the foil pot would be my primary method of purification. I should note that while there is a risk of waterborne parasites anywhere you go, there are many outdoorsmen in my neck of the woods who have drunk straight from lakes and streams their whole life without getting sick. You should try to purify water if possible, but a chance of illness is preferable to certain death if you are really dehydrated in my opinion. Avoiding stagnant water and gathering from moving sources will help decrease your chances of illness.
- Potassium Permanganate – An antiseptic. Mixed with water to a deep purple it will help treat foot fungus and disinfect sores (I know from experience how debilitating foot problems can be in the woods). It is also said that when mixed sparingly with water (to a light pink) it will serve as a means of water purification, but I have never tried it. It should be noted that all chemical purifiers should be used as a back up, not as a permanent source of drinking water. Since a purifying agent is basically a low dose poison (meant to kill the critters in our water), I have heard that long term use can lead to some pretty bad kidney or liver problems. When mixed with sugar or glycerin (another sugar), potassium permanganate will also start a fire quite effectively (something well demonstrated on Survivorman). It is a useful chemical to carry in your kit.
- First Aid Supplies – Bandaid, butterfly closures, alcohol swab, and Neosporin. Open wounds can fester in unsanitary situations and become major health liabilities, so a few first aid supplies can be a lifesaver.
- Pencil and Paper – Good for making patrol maps, tracking bearings and time travelled, and if things are bad enough, your last will and testament.
- Button Compass – Even if you do not know where you are, if conditions are such where travel is preferable to staying put, there are few places on this continent where heading along a constant bearing won’t lead you to a trail, logging road, or other thoroughfare. Knowing direction is also useful for tracking time (East = 6 AM, South East = 9 AM, South = Noon, etc) and wind direction (where I live wind can often be an indicator of weather; E = wet, W= clear, N = cold, S = warm – not always, but often).
- $100 Bill – People will generally help a lost individual without question, but Ben Franklin is still a hand guy to have around. If nothing else, he can buy me cold beer and a greasy burger after I “get found.”
The survival kit is a toolbox with items that will make survival potentially easier should the occasion arise, but will unlikely be the only item that you carry into the wild. Rather than make a kit that has everything you may need, you can save a lot of size and weight by building it to augment what you already carry.
Some basic items that I carry during the summer months can be seen here. They include:
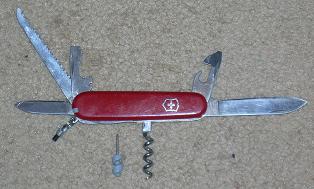 Swiss Army Knife – I carry the Victorinox Camper model as it has the tools I use most: two knives, wood saw, reamer/awl, etc. If you are wondering what the little thing attached to the lanyard ring is, it is a Torch Lighter Flint (used in the igniters for acetylene torches) with a hole drilled into the aluminum threaded base to facilitate
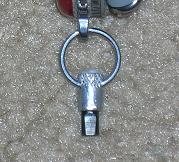 attaching it to the knife, and a small amount of cotton wool packed into the threads. It is an idea I found in the Backwoodsman Magazine (an awesome periodical for anyone interested in bushcraft and self reliant living) and allows me to carry a firesteel without making my knife awkward to carry or use.
- Bic Lighter wrapped with Duct Tape – Cheap, reliable, and effective. You cannot have too many means of starting fire at you disposal, and duct tape is second only to toilet paper as a crowning achievement of civilization.
- Heatsheets Emergency Bivvy, made by Adventure Medical Kits – I am sure that all of you are familiar with space blankets; this is a space blanket sleeping bag. They are not particularly comfortable or quiet (they like to crinkle when you move), but can keep you from freezing to death.
- Equinox Silnylon Poncho with 550 cord to serve as guy lines – An ultralight poncho that has grommets to make it function as a tarp. Ponchos make great rain gear (except when in a canoe and the wind is coming from straight ahead), and a tarp will greatly simplify waterproofing your shelter. Keeping dry is key to avoiding hypothermia and fungal diseases.
Winter presents its own set of challenges; water is clean and abundant in the form of snow and animals are easier to track, but shelter takes on the ultimate imperative. Here is what I keep in my parka, and not just when in the woods. A broken down vehicle can quickly turn into a struggle to survive in cold weather (my thermometer read -18F Friday morning; plenty cold to kill you).
- Matches and Tinder Tabs – Not paper matches this time, but high quality lifeboat matches that burn for up to 15 seconds under water. When you need fire in winter, you need it bad!
- Candle – not the highest BTU output, but does the job when used correctly.
- Space Banket – Not a premade unit like the last one, just a large sheet. The idea is to sit and wrap it around you with the lit candle between your legs; that way all the heat from the candle will reflect and stay within the confines of the blanket. Just keep your head exposed so you don’t have carbon monoxide issues.
- 55 Gallon Drum Liner – Basically a really heavy and large trash bag. Makes a quickie tarp.
- Wool Socks – I wear dress socks to work (not great for insulation) and cotton when driving normally (cotton + wet + cold = amputation). As the feet are one of the first places to suffer from the cold, and since when feet are injured survival becomes way more difficult, wool socks can help to keep my feet functioning in an emergency. If I am already wearing wool socks, I have a dry pair in case my feet get wet (wool maintains 85% of its insulation when wet, but soaking feet in heavy boots can cause trench foot).
- Two lengths of 550 Cord – If stuck in deep snow, cutting the tops off of two evergreen trees will provide field expedient snowshoes. The rope is to make bindings for them.
- Wire Saw – While I don’t include this in my regular kit, in winter deep snow can make firewood more difficult to get to, and green wood is needed as a base to keep your fire out of the snow.
To sum up, this list is meant to give you ideas for your own kit. Your needs and skills will determine what is right for you. I warn you, building survival kits can become an obsession; a quest for the perfect kit. A survival kit is no substitute for knowledge of your environment or common sense, but it will give you an edge when you need it most.

Every once in a while you will just be tooling along, minding your own business, and you will come upon something so simple and brilliant that you think, “why didn’t I think of that?” I was just running searches online the other day and came upon this site. The idea of using a smoothed stick to cast and reel fishing line has probably been explored in depth by many other people, but I have not been able to find any other sites that talk about fishing in this manner.
Anyone who has ever bought or assembled a survival kit has most likely included a length of fishing line, several hooks, and maybe a few sinkers as they are small, light, and take up little space. Many experts recommend fishing as perhaps the easiest source of animal protein (although any of us who have been skunked on a fishing trip might debate that), and its therapeutic nature could help to calm someone suffering from the shock of being lost and alone.
However, once you are out there with your hooks and line, how do you use them effectively? Hand lining would be an obvious choice. How much more primitive can you get than sitting beside a stream with a line in your hand. But how do you cast? Simply attempting to throw coiled line out of your hand will likely result in a tangled monofilament nightmare.
How about tying the end to a stick? Many millions of fish have been caught by people using nothing more than a length of bamboo, a string, a hook, and a worm. The down side is that you only will have a reach of a few feet unless you can rig some king of casting system.
I once had the trying experience of breaking my fishing rod on the first day of a canoe trip; a plight that I am sure many can relate. Here was my solution:

I took the handle from my broken rod and inserted a length peeled maple. At the tip end I used fishing line to lash on a three way swivel for use as a ferrule. The 550 cord is there as a backing to strengthen the rod, similar to the way that the Inuit would back their bows with sinew cord. It worked, but I had the advantage of a reel and full tackle box a my disposal. I am sure that you could whip up a nifty rod using safety pins as ferrules and perhaps creating a reel of sorts out of scavenged materials, but I wanted something a little more foolproof for my needs.
Another method, and one that I learned back in my Boy Scout days, was “hobo fishing.” Ray Mears has a nice video for those of you not familiar with the concept. Basically, you wrap fishing line around something smooth like a soda can (I think I am the only Minnesotan who says “soda”), toss the weighted end to the fish, and reel the line in by wrapping it around the can. For a long time I had line wrapped around my survival kit tin for that purpose (I will post my survival kit at a later date), but the line eventually began to fall off of the tin and would wear against other things in my pocket, so I now I carry about 50′ of 8# fluorocarbon line on a sewing machine bobbin.
The hobo method is great, but it can be difficult to cast long distances with accuracy. Enter the casting stick. The casting stick applies the same principle as hobo fishing, but uses a length of stick to give you the leverage to cast more effectively. It is about the most simple device you could make, but if you are like me, you want pictures. So here we go…

All you need is a dry stick (a wet one might make the line coils stick), a knife or abrasive stone, some fishing line, a hook, and maybe a bobber (although a wooden one can be fashioned on site). For mine I am using a bobbin to hold extra line and a couple rings from an old inner tube (makes great rubber bands) to help keep things neat.
From there, just taper the end that you want to wrap the line on and smooth out the stick as much as possible. Any slivers or burrs might catch the line and mess up your cast. Here is the finished product:

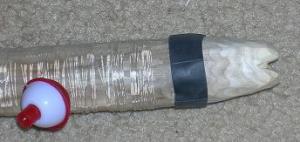 I also carved a bit of a notch in the end to facilitate casting. Just set the hook end of the line in the notch (the notch should be oriented up-and-down), leaving a foot or two to dangle, and it will keep the line from falling of the stick as you bring it up to cast.
I didn’t want to cut my fishing line so I used one of the rubber bands to hold the bobbin firmly on the pole. I pulled about 30 feet of line out and wrapped it around the stick, securing the hook with another rubber band. That’s it. Pretty simple.
I will admit that I have not actually fished with it yet, but I tried a couple of practice casts in my backyard and the line shot off perfectly. Hunting season is still wrapping up here (I don’t really feel like being shot) and it is way too early for ice fishing (and most successful ice fishermen find casting unnecessary anyway). Come spring I intend to give it a whirl, and I will let you know how it works.
Remember: if you give a man a fish, you feed him for a day. If you teach him to make a casting stick, his friends will think he is a dork… But a dork with fish!
Fire is a magical thing, and more fun to watch than most TV shows (which shows how limited my sense of fun is). Our ancestors were really no different than any other primate until they learned to control fire. Most naturally occurring wildfires come from lightning strikes (the only other source I know of would be volcanic eruption, but I could be wrong), and for a long time that was the Homo family’s only real source of fire. Then one day some super genius, who makes all other geniuses of history pale in comparison, discovered that with a little wood and a lot of patience you can start a fire by rubbing two sticks together.
There are many ways to start a friction fire, but the one that you will see in all survival manuals is the bow drill. Why? Two words: mechanical advantage. Other methods, like the hand drill or fire plow, are completely valid methods of fire starting, and their practitioners are truly impressive to watch. However, the bow drill uses the mechanical advantage of the bow and increased pressure from the socket to make the process of bringing wood dust to 800 degrees Fahrenheit much easier. Here in Minnesota it is either (a) humid or (b) cold at any given time, both of which make a friction fire a more difficult proposition.
I am not going to go through a lecture of explaining the principles of the bow drill; there are already many excellent books and websites that explain the process in detail (my favorite is here). I will describe what tricks I have learned from making fires with a bow drill. At this point I have made a couple of dozen fires with several drill sets over the last couple of years (I apologize for not having any action photographs, but it is really hard to shoot a camera while pumping the drill), so I believe that I can say that I am consistent under good conditions (i.e. not too humid).
90% of the bow drill’s success lies in the selection of wood. I wish I could give you a careful list of wood species that work better than others, but I select wood by feel, not by species. In the woods behind my house there are mostly quaking aspen, white birch, and black ash, so I am confident in the qualities of those woods in particular. I have also had luck with cedar, but most evergreens are generally regarded by those I have read as being a poor choice for friction fire. The qualities I look for are:
- The wood should be dry, light, and quite firm. Cut into the wood to make sure that the core is not punky or damp. Unless you have tools to fell a dead standing tree (a live tree will probably have too much moisture to work), you will most likely be gathering dead wood from the ground, so be wary of rotted wood. If the hearth wood indents more than about 1/8 of an inch when the drill is firmly pressed into it, it will generally turn to dust rather than heat up to combustion temperatures.
- The drill needs to be as straight as possible. While a longer drill makes it easier to operate the bow and will last longer, if it has any bend in it at all it will be difficult to keep in the notch. I have used drills that were only 5 inches long, and although I banged my knuckles on the ground a lot, they worked.
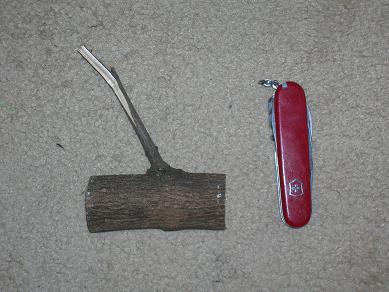
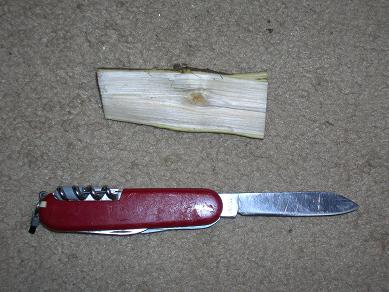
- The hand socket is best made, in my opinion, from a section of branch with a knot in it. If you split the branch down the middle so that the knot will be in your palm when operating the drill (trimming it to make it comfortable, of course), the wood will be harder (you don’t want the socket to wear too quickly), and often will form a natural socket during the splitting process. By the way, you can split a branch with a pocket knife if you use a stick as a mallet to drive it in, so if you don’t have an axe you can still form a flat surface. There are alternative materials to make sockets from (that Australian site I linked has a cool method using a beer cap, but I have only used it successfully once), but wood will generally be the most prevalent.
Just carve a small depression in the low spot formed by the knot
- The bow is generally the easiest piece to find; you just need a springy branch. The cord can be the harder part to pull out of nature (I have tried using cordage made on the spot, but it usually wears out before I can get a coal), but do not despair. Unless you went into the wilderness buck naked (not advisable during black fly season), you can use your clothing. Shoelaces are the best option, but you could also cut the hem of you shirt off and tie that to the bow (twisting it to make it round in cross section).
Now comes the tricky part: starting the fire. Again, there are many good sources of information on how to do this, so I will limit myself to giving tips.
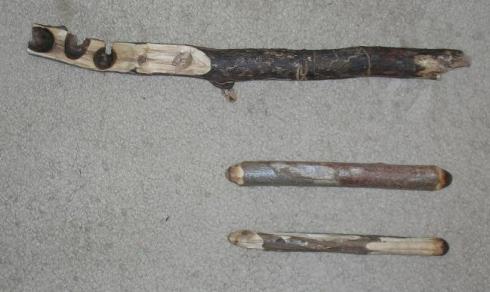
Here is a round hearth and a couple of drills that I used succesfully
- You don’t need a flat board. Most diagrams of a bow drill show what looks like a piece of milled lumber as a hearth. Unless you can scavenge a 2X4 from your survival site (which is possible, but I would not rely on it), you will be starting with round sticks. All you really need to do is carve it flat enough on the top to be able to start the drill; your foot pressure will usually keep the drill from moving. A round hearth can often be an asset as you can roll it to a different angle if the drill is wandering on the notch or if you prefer to drill at a slight angle.
- Make the bottom of the drill (where it meets the hearth) a shallow point. Most books tell you to keep this flat, but I have found that a slight point will help you to start the drill into the hearth. Unless you are willing to spend 10 minutes carving the perfect depression for a flat drill, you will find it frustrating keeping a flat bottomed drill from migrating all over the hearth. As the drilling progresses the drill will even out with the hearth anyway.
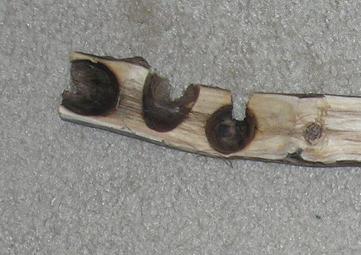
- Drill at a slight angle so that the drill pressure is away from the notch. Often if you drill straight down, the dill will wear itself toward the notch, which can result in the hearth socket disintegrating.
The socket on the right was successful, but the two on the left are examples of how the drill can eat its way out of the hearth
- Try not to lift the drill off of the hearth. You are relying on the insulating properties of the wood to help hold the temperature from the friction. Pulling the drill out of the hearth is like opening a house door in the winter; it lets all the heat out.
- It is okay to rest. When I am building a fire, I will usually rest for two deep breaths every 30 seconds. As long as you keep the drill on the hearth, it will hold the heat.
- Watch the dust pile. The fiction will create a mound of sawdust in front of the notch in the hearth. This is the tinder that will eventually form your coal, and thus is precious. I generally leave the dust alone, but if I am creating an especially big pile I will knock a little of it away to make sure that oxygen is getting to the base.
- Keep the process going until you see smoke coming out of the dust pile in front of the notch. You will see copious amounts of smoke coming from the around the drill, but when smoke is starting to stream from dust itself, you have a coal.
- Once you have your smoking pile of dust, leave it alone for a bit. The worst thing you can do is try to transfer it to the tinder before it forms a coal. The pile will smolder on its own for a good five minutes, so shake out your arms, ready your tinder, and do your happy dance.
There are few feelings as good as starting a fire with a bow drill. It is a primal sensation that gives you a sense of mastery over your surrounding. However, there are some important observation I must make about the bow drill.
- Even with good materials it can take hours of effort to get a fire going. Do not expect to gather some sticks off of the forest floor and have a fire in 20 minutes. If you are in a survival situation and you do not have an alternative fire starting method, expect as a matter of practicality to spend half a day making your fire. If it is really wet or humid you may never get a fire going by friction. Practice will make the bow drill more reliable for you, but always err on the side of safety.
- Once you have a fire going, make every effort to keep it going and bank the ashes at night to keep them smoldering.
- Even if you have an alternative fire starting method, you still may want to gather the materials for a bow drill in case you are stuck in a long term survival situation. Peeled wood will dry quite fast, and if you make a drill set and allow it to dry in your shelter for a few days (along with some tinder to keep it dry), you will be ahead of the game if you need it later.
If you hope to use the bow drill method when it matters, I recommend you practice now. That first fire can be insanely difficult to start, but once you get that one going, the rest will come easier. If nothing else, you will learn to appreciate matches and lighters, and will probably start carrying one everywhere just in case. I always have a fire starter on my Swiss army knife (which I carry everywhere but the shower; that would just be weird) and multiple fire starters in my survival kit, but if I lose them I know that I might be able to get a fire going anyway. Survival is like poker: it is a game of odds, but an experienced player can stack the odds in his or her favor.
My name is Seth and this blog will serve as my soapbox from which I will try to describe my trials and tribulations in the world of hillbilliness (I think they should add that to dictionary). We live in a modern world of specialists (my college learned specialties being history and accounting; I will probably explain that combination later) where we generally focus our expertise in one specific vocation. While there is nothing wrong with specialization, in fact civilization as we know it depends on it, there is a deep seated desire in many of us to go back to a simpler time where a person could live without the trappings of civilization. Thus I give my ode to the hillbilly. From the defiant moonshiner to the philosophical ascetic, the hillbilly is a person who lives on his or her own terms.
I would like to state first and foremost that I am a survival and bushcraft enthusiast; I do not claim to be an expert. I have spent many years reading books published by experts. Some of them were good and some of them were terrible, and I ultimately came to the conclusion that reading about bushcraft is not the same as actually knowing bushcraft. With that insight I have since been striving to apply my book learning to the pursuit of gaining practical experience in the ever glamorous hillbilly lifestyle.
My goal in all of this shenanigans is to someday be able to wander into the forest and live indefinitely using only the resources of nature, the knowledge in my head, and a few rolls of quilted toilet paper (for all of modern societies faults, we did get that one right). I can say with all honesty that I have a long ways to go.
One of my great frustrations in reading about bushcraft and survival is that most books tend to be pretty general and can skip over some important details that might make the difference between success and failure. I will try to share insights that I have gained through experience to hopefully ease the paths of those who are attempting to lean these skills for themselves.
My focus will be on survival and bushcraft (which I would probably define as survival for an indefinite period), but I will also try to include my experiences as a devout canoeist, mediocre fisherman, causal brewer (but enthusiastic drinker!), any other topic that I think might prove interesting to all of you out there.
I live in northern Minnesota, a place known for iron mining, the Boundary Water Canoe Area Wilderness, and the ubiquitous “You Betcha!” The Greek poet Hesiod once described his hometown as “miserable in winter, sultry in summer, and beautiful at no time of year.” While the Minnesota winter has made Sorels acceptable business attire, and summer often brings hordes of mosquitoes and black flies that make a flak cannon seem like a reasonable purchase, it is my home and it is truly beautiful.
If you are good, someday I might tell you where this place is…


Recent Comments